---
# required metadata
title: Use the Visual Studio Code mssql extension for SQL Server | Microsoft Docs
description: This tutorial shows how to use the mssql extension for VS Code. This extension allows you to edit and run Transact-SQL scripts in VS Code.
author: erickangMSFT
ms.author: erickang
manager: jhubbard
ms.date: 03/17/2017
ms.topic: article
ms.prod: sql-linux
ms.technology: database-engine
ms.assetid: 9766ee75-32d3-4045-82a6-4c7968bdbaa6
# optional metadata
# keywords: ""
# ROBOTS: ""
# audience: ""
# ms.devlang: ""
# ms.reviewer: ""
# ms.suite: ""
# ms.tgt_pltfrm: ""
ms.custom: H1Hack27Feb2017
---
# Use Visual Studio Code to create and run Transact-SQL scripts for SQL Server
This topic shows how to use the **mssql** extension for Visual Studio Code (VS Code) to develop SQL Server databases.
Visual Studio Code is a graphical code editor for Linux, macOS, and Windows that supports extensions. The [**mssql** extension for VS Code] enables you to connect to SQL Server, query with Transact-SQL (T-SQL), and view the results.
## Install VS Code
1. If you have not already installed VS Code, [Download and install VS Code] on your machine.
2. Start VS Code.
## Install the mssql extension
The following steps explain how to install the mssql extension.
1. Press **CTRL+SHIFT+P** (or **F1**) to open the Command Palette in VS Code.
2. Select **Install Extension** and type **mssql**.
> [!TIP]
> For macOS, the **CMD** key is equivalent to **CTRL** key on Linux and Windows.
2. Click install **mssql**.
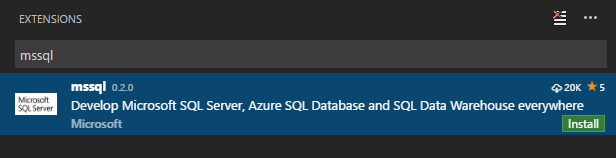 3. The **mssql** extension takes up to one minute to install. Wait for the prompt that tells you it successfully installed.
 > [!NOTE]
> For macOS, you must install OpenSSL. This is a pre-requisite for .Net Core used by the mssql extension. Follow the **install pre-requisite** steps in the [.Net Core instructions]. Or, you can run the following commands in your macOS Terminal.
>
> ```bash
> brew update
> brew install openssl
> ln -s /usr/local/opt/openssl/lib/libcrypto.1.0.0.dylib /usr/local/lib/
> ln -s /usr/local/opt/openssl/lib/libssl.1.0.0.dylib /usr/local/lib/
> ```
> [!NOTE]
> For Windows 8.1, Windows Server 2012 or lower versions, you must download and install the [Windows 10 Universal C Runtime]. Download and open the zip file. Then run the installer (.msu file) targeting your current OS configuration.
## Create or open a SQL file
The **mssql** extension enables mssql commands and T-SQL IntelliSense in the editor when the language mode is set to **SQL**.
1. Press **CTRL+N**. Visual Studio Code opens a new 'Plain Text' file by default.
2. Press **CTRL+K,M** and change the language mode to **SQL**.
> [!NOTE]
> For macOS, you must install OpenSSL. This is a pre-requisite for .Net Core used by the mssql extension. Follow the **install pre-requisite** steps in the [.Net Core instructions]. Or, you can run the following commands in your macOS Terminal.
>
> ```bash
> brew update
> brew install openssl
> ln -s /usr/local/opt/openssl/lib/libcrypto.1.0.0.dylib /usr/local/lib/
> ln -s /usr/local/opt/openssl/lib/libssl.1.0.0.dylib /usr/local/lib/
> ```
> [!NOTE]
> For Windows 8.1, Windows Server 2012 or lower versions, you must download and install the [Windows 10 Universal C Runtime]. Download and open the zip file. Then run the installer (.msu file) targeting your current OS configuration.
## Create or open a SQL file
The **mssql** extension enables mssql commands and T-SQL IntelliSense in the editor when the language mode is set to **SQL**.
1. Press **CTRL+N**. Visual Studio Code opens a new 'Plain Text' file by default.
2. Press **CTRL+K,M** and change the language mode to **SQL**.
 3. Alternatively, open an existing file with .sql file extension. The language mode is automatically **SQL** for files that have the .sql extension.
## Connect to SQL Server
The following steps show how to connect to SQL Server with VS Code.
1. In VS Code, press **CTRL+SHIFT+P** (or **F1**) to open the Command Palette.
2. Type **sql** to display the mssql commands.
3. Alternatively, open an existing file with .sql file extension. The language mode is automatically **SQL** for files that have the .sql extension.
## Connect to SQL Server
The following steps show how to connect to SQL Server with VS Code.
1. In VS Code, press **CTRL+SHIFT+P** (or **F1**) to open the Command Palette.
2. Type **sql** to display the mssql commands.
 3. Select the **MS SQL: Connect** command. You can simply type **sqlcon** and press **ENTER**.
4. Select **Create Connection Profile**. This creates a connection profile for your SQL Server instance.
5. Follow the prompts to specify the connection properties for the new connection profile. After specifying each value, press **ENTER** to continue.
The following table describes the Connection Profile properties.
| Setting | Description |
|-----|-----|
| **Server name** | The SQL Server instance name. For this tutorial, use **localhost** to connect to the local SQL Server instance on your machine. If connecting to a remote SQL Server, enter the name of the target SQL Server machine or its IP address. |
| **[Optional] Database name** | The database that you want to use. For purposes of this tutorial, don't specify a database and press **ENTER** to continue. |
| **User name** | Enter the name of a user with access to a database on the server. For this tutorial, use the default **SA** account created during the SQL Server setup. |
| **Password (SQL Login)** | Enter the password for the specified user. |
| **Save Password?** | Type **Yes** to save the password. Otherwise, type **No** to be prompted for the password each time the Connection Profile is used. |
| **[Optional] Enter a name for this profile** | The Connection Profile name. For example, you could name the profile **localhost profile**.
> [!Tip]
> You can create and edit connection profiles in User Settings file (settings.json). Open the settings file by selecting **Preference** and then **User Settings** in the VS Code menu. For more details, see [manage connection profiles].
6. Press the **ESC** key to close the info message that informs you that the profile is created and connected.
> [!TIP]
> If you get a connection failure, first attempt to diagnose the problem from the error message in the **Output** panel in VS Code (select **Output** on the **View** menu). Then review the [connection troubleshooting recommendations].
7. Verify your connection in the status bar.
3. Select the **MS SQL: Connect** command. You can simply type **sqlcon** and press **ENTER**.
4. Select **Create Connection Profile**. This creates a connection profile for your SQL Server instance.
5. Follow the prompts to specify the connection properties for the new connection profile. After specifying each value, press **ENTER** to continue.
The following table describes the Connection Profile properties.
| Setting | Description |
|-----|-----|
| **Server name** | The SQL Server instance name. For this tutorial, use **localhost** to connect to the local SQL Server instance on your machine. If connecting to a remote SQL Server, enter the name of the target SQL Server machine or its IP address. |
| **[Optional] Database name** | The database that you want to use. For purposes of this tutorial, don't specify a database and press **ENTER** to continue. |
| **User name** | Enter the name of a user with access to a database on the server. For this tutorial, use the default **SA** account created during the SQL Server setup. |
| **Password (SQL Login)** | Enter the password for the specified user. |
| **Save Password?** | Type **Yes** to save the password. Otherwise, type **No** to be prompted for the password each time the Connection Profile is used. |
| **[Optional] Enter a name for this profile** | The Connection Profile name. For example, you could name the profile **localhost profile**.
> [!Tip]
> You can create and edit connection profiles in User Settings file (settings.json). Open the settings file by selecting **Preference** and then **User Settings** in the VS Code menu. For more details, see [manage connection profiles].
6. Press the **ESC** key to close the info message that informs you that the profile is created and connected.
> [!TIP]
> If you get a connection failure, first attempt to diagnose the problem from the error message in the **Output** panel in VS Code (select **Output** on the **View** menu). Then review the [connection troubleshooting recommendations].
7. Verify your connection in the status bar.
 ## Create a database
1. In the editor, type **sql** to bring up a list of editable code snippets.
## Create a database
1. In the editor, type **sql** to bring up a list of editable code snippets.
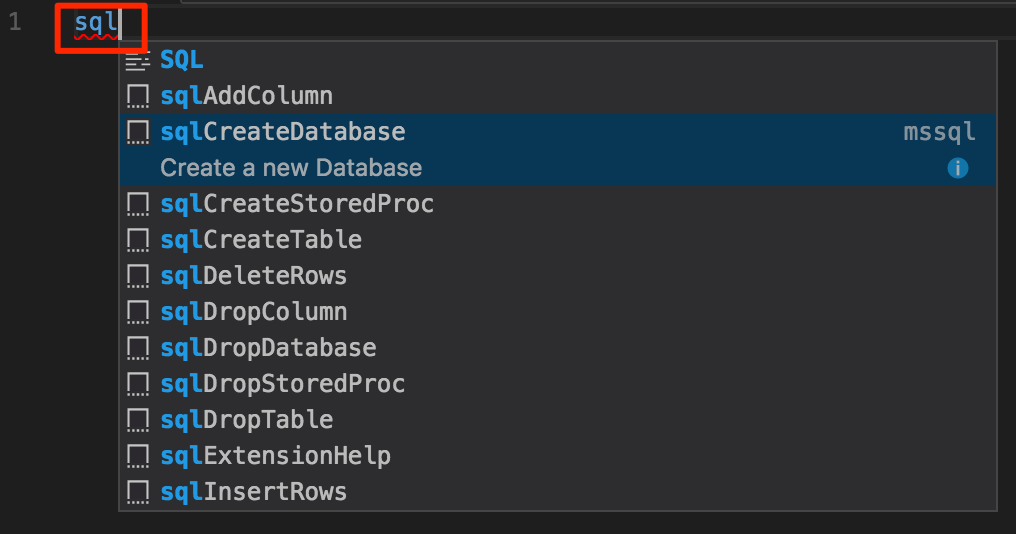 2. Select **sqlCreateDatabase**.
3. In the snippet, type **TutorialDB** for the database name.
```sql
USE master
GO
IF NOT EXISTS (
SELECT name
FROM sys.databases
WHERE name = N'TutorialDB'
)
CREATE DATABASE [TutorialDB]
GO
```
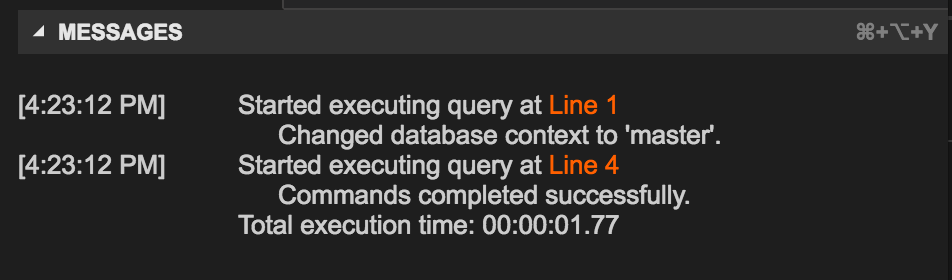
4. Press **CTRL+SHIFT+E** to execute the Transact-SQL commands. View the results in the query window.
2. Select **sqlCreateDatabase**.
3. In the snippet, type **TutorialDB** for the database name.
```sql
USE master
GO
IF NOT EXISTS (
SELECT name
FROM sys.databases
WHERE name = N'TutorialDB'
)
CREATE DATABASE [TutorialDB]
GO
```
4. Press **CTRL+SHIFT+E** to execute the Transact-SQL commands. View the results in the query window.
 > [!TIP]
> You can customize shortcut key bindings for the mssql extension commands. See [customize shortcuts].
## Create a table
1. Remove the contents of the editor window.
2. Press **F1** to display the Command Palette.
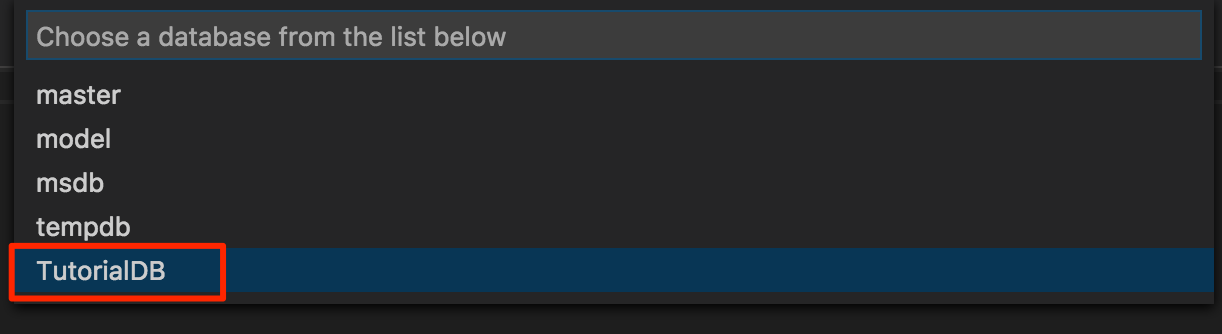
3. Type **sql** in the Command Palette to display the SQL commands or type **sqluse** for **MS SQL:Use Database** command.
4. Click **MS SQL:Use Database**, and select the **TutorialDB** database. This changes the context to the new database created in the previous section.
> [!TIP]
> You can customize shortcut key bindings for the mssql extension commands. See [customize shortcuts].
## Create a table
1. Remove the contents of the editor window.
2. Press **F1** to display the Command Palette.
3. Type **sql** in the Command Palette to display the SQL commands or type **sqluse** for **MS SQL:Use Database** command.
4. Click **MS SQL:Use Database**, and select the **TutorialDB** database. This changes the context to the new database created in the previous section.
 3. In the editor, type **sql** to display the snippets, and then select **sqlCreateTable** and press **enter**.
4. In the snippet, type **Employees** for the table name.
5. Press **Tab**, and then type **dbo** for the schema name.
> [!NOTE]
> After adding the snippet, you must type the table and schema names without changing focus away from the VS Code editor.
6. Change the column name for **Column1** to **Name** and **Column2** to **Location**.
```sql
-- Create a new table called 'Employees' in schema 'dbo'
-- Drop the table if it already exists
IF OBJECT_ID('dbo.Employees', 'U') IS NOT NULL
DROP TABLE dbo.Employees
GO
-- Create the table in the specified schema
CREATE TABLE dbo.Employees
(
EmployeesId INT NOT NULL PRIMARY KEY, -- primary key column
Name [NVARCHAR](50) NOT NULL,
Location [NVARCHAR](50) NOT NULL
);
GO
```
7. Press **CTRL+SHIFT+E** to create the table.
## Insert and query
1. Add the following statements to insert four rows into the **Employees** table. Then select all the rows.
```sql
-- Insert rows into table 'Employees'
INSERT INTO Employees
([EmployeesId],[Name],[Location])
VALUES
( 1, N'Jared', N'Australia'),
( 2, N'Nikita', N'India'),
( 3, N'Tom', N'Germany'),
( 4, N'Jake', N'United States')
GO
-- Query the total count of employees
SELECT COUNT(*) as EmployeeCount FROM dbo.Employees;
-- Query all employee information
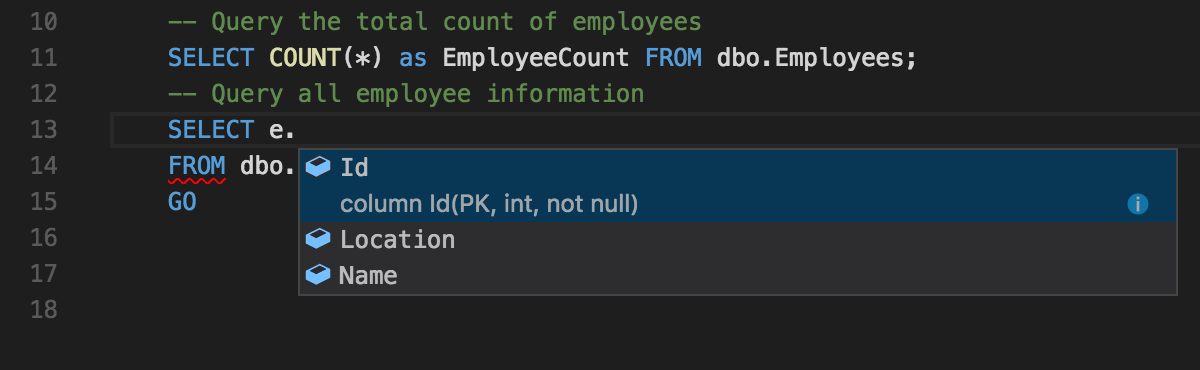
SELECT e.EmployeesId, e.Name, e.Location
FROM dbo.Employees as e
GO
```
> [!TIP]
> While you type, use the assistance of the T-SQL IntelliSense.
>
3. In the editor, type **sql** to display the snippets, and then select **sqlCreateTable** and press **enter**.
4. In the snippet, type **Employees** for the table name.
5. Press **Tab**, and then type **dbo** for the schema name.
> [!NOTE]
> After adding the snippet, you must type the table and schema names without changing focus away from the VS Code editor.
6. Change the column name for **Column1** to **Name** and **Column2** to **Location**.
```sql
-- Create a new table called 'Employees' in schema 'dbo'
-- Drop the table if it already exists
IF OBJECT_ID('dbo.Employees', 'U') IS NOT NULL
DROP TABLE dbo.Employees
GO
-- Create the table in the specified schema
CREATE TABLE dbo.Employees
(
EmployeesId INT NOT NULL PRIMARY KEY, -- primary key column
Name [NVARCHAR](50) NOT NULL,
Location [NVARCHAR](50) NOT NULL
);
GO
```
7. Press **CTRL+SHIFT+E** to create the table.
## Insert and query
1. Add the following statements to insert four rows into the **Employees** table. Then select all the rows.
```sql
-- Insert rows into table 'Employees'
INSERT INTO Employees
([EmployeesId],[Name],[Location])
VALUES
( 1, N'Jared', N'Australia'),
( 2, N'Nikita', N'India'),
( 3, N'Tom', N'Germany'),
( 4, N'Jake', N'United States')
GO
-- Query the total count of employees
SELECT COUNT(*) as EmployeeCount FROM dbo.Employees;
-- Query all employee information
SELECT e.EmployeesId, e.Name, e.Location
FROM dbo.Employees as e
GO
```
> [!TIP]
> While you type, use the assistance of the T-SQL IntelliSense.
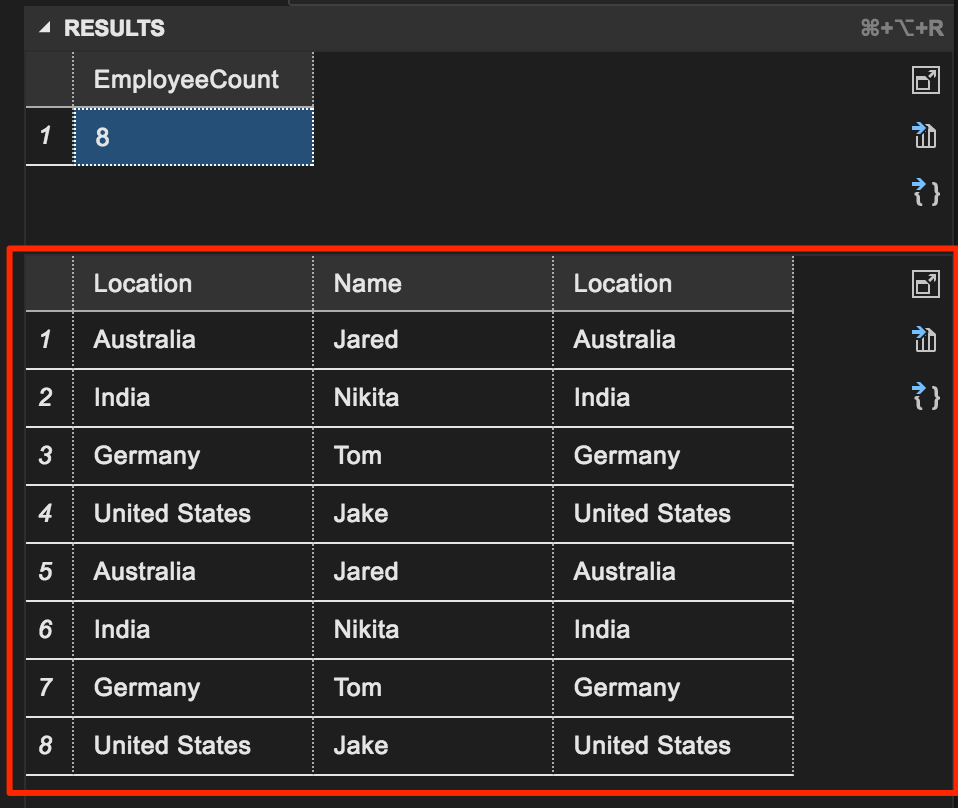
>  2. Press **CTRL+SHIFT+E** to execute the commands. The two result sets display in the **Results** window.
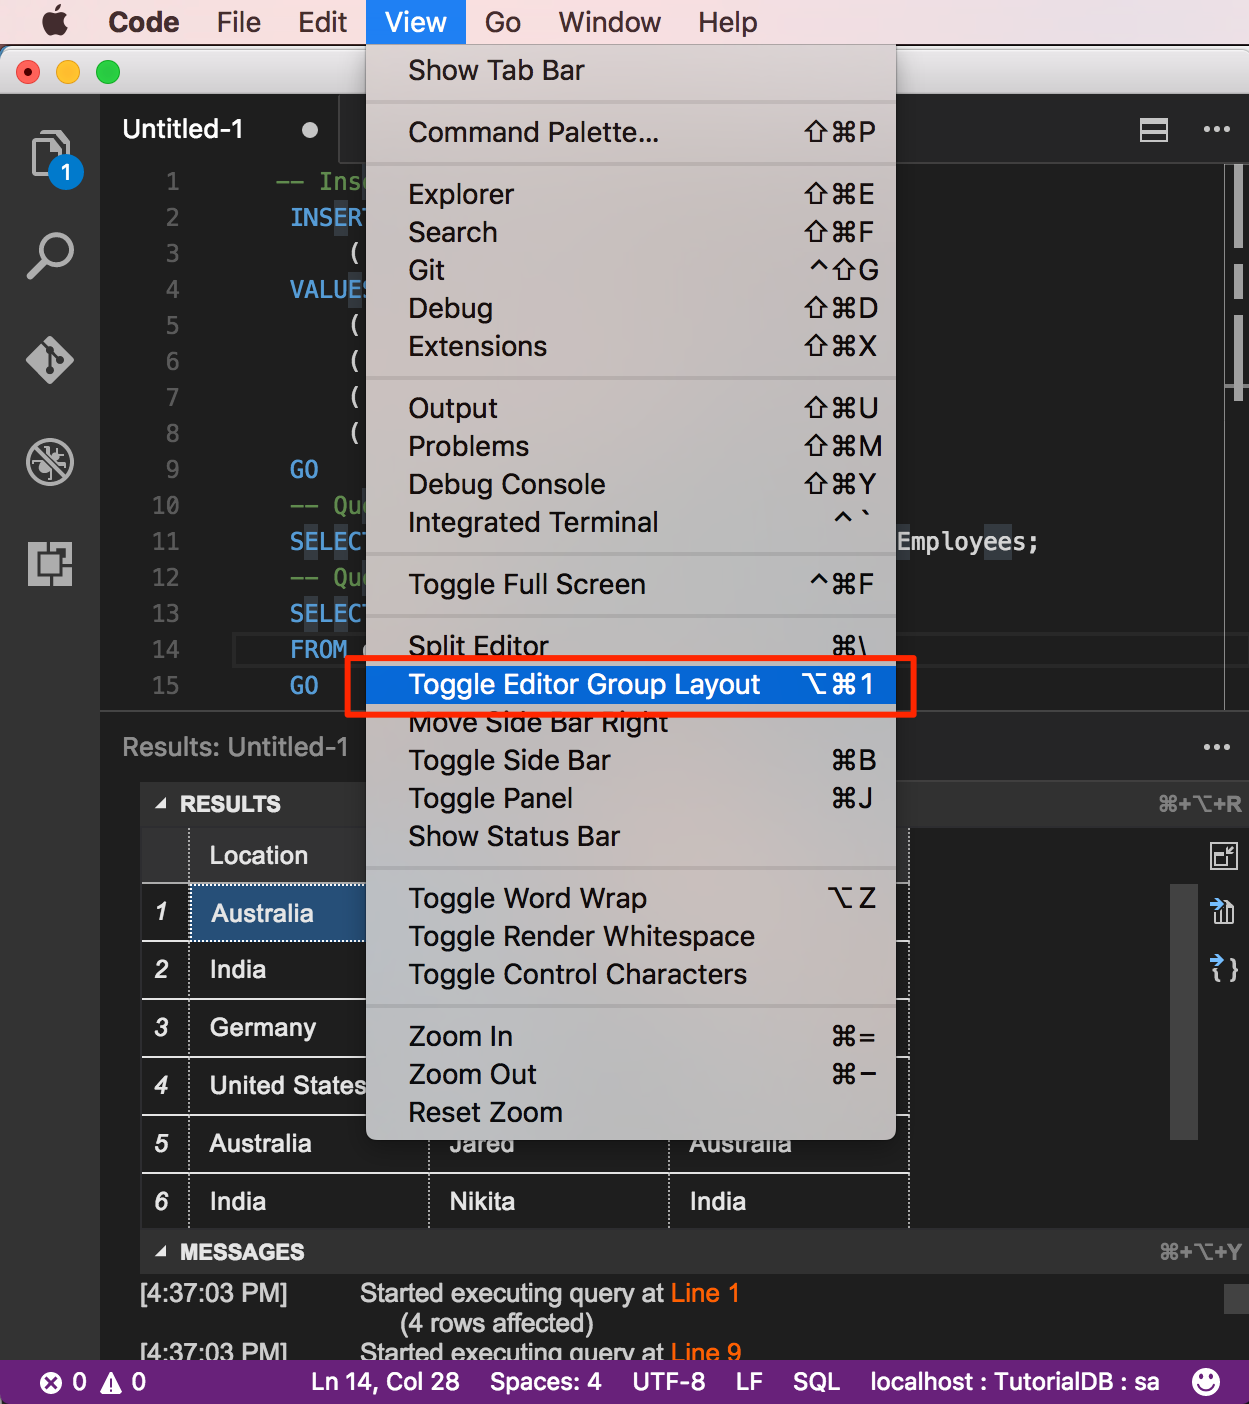
 ## View and save the result
1. On the **View** menu, select **Toggle Editor Group Layout** to switch to vertical or horizontal split layout.
## View and save the result
1. On the **View** menu, select **Toggle Editor Group Layout** to switch to vertical or horizontal split layout.
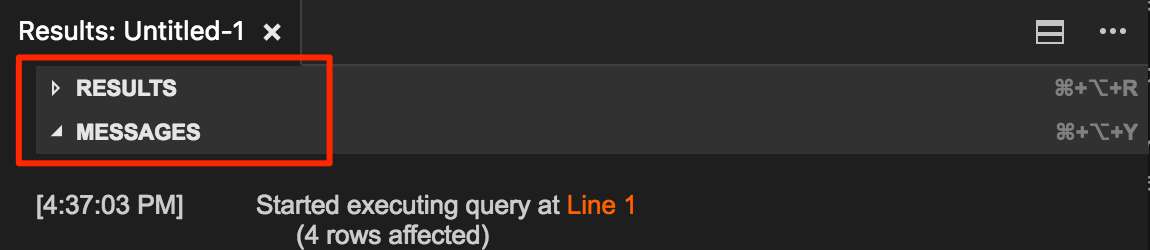
 2. Click the **Results** and **Messages** panel header to collapse and expand the panel.
 > [!TIP]
> You can customize the default behavior of the mssql extension. See [customize extension options].
2. Click the maximize grid icon on the second result grid to zoom in.
> [!TIP]
> You can customize the default behavior of the mssql extension. See [customize extension options].
2. Click the maximize grid icon on the second result grid to zoom in.
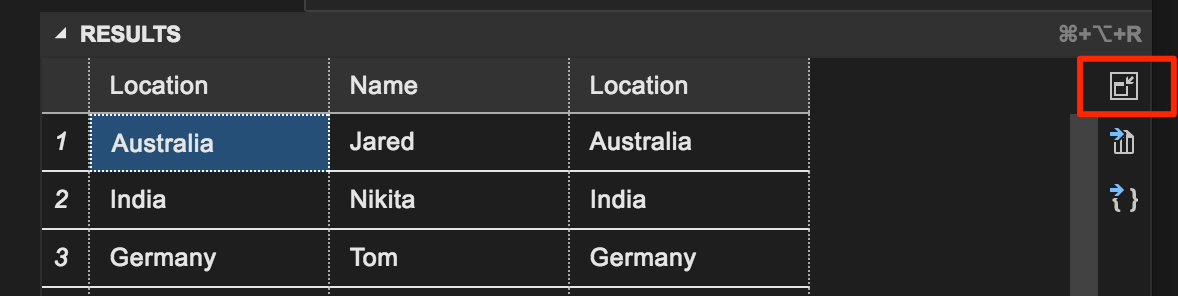 > [!NOTE]
> The maximize icon displays when your T-SQL script has two or more result grids.
3. Open the grid context menu with the right mouse button on a grid.
> [!NOTE]
> The maximize icon displays when your T-SQL script has two or more result grids.
3. Open the grid context menu with the right mouse button on a grid.
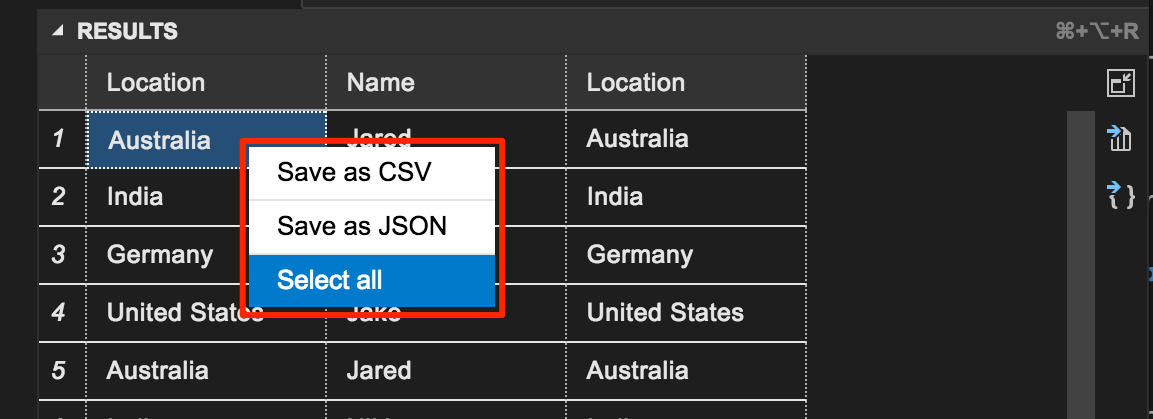 4. Select **Select All**.
5. Open the grid context menu and select **Save as JSON** to save the result to a .json file.
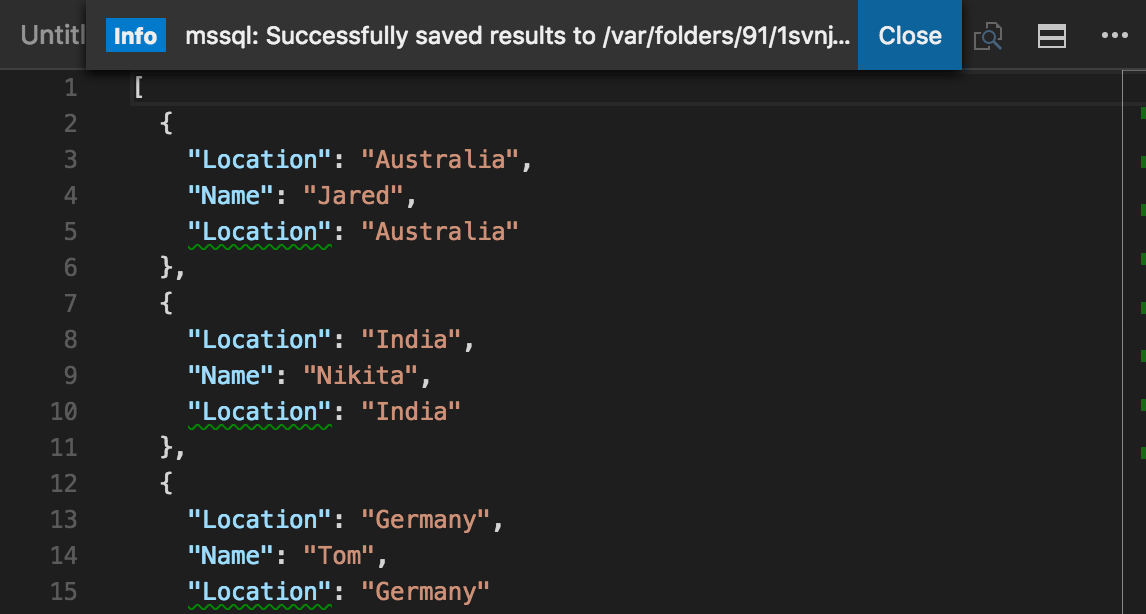
6. Specify a file name for the JSON file. For this tutorial, type **employees.json**.
7. Verify that the JSON file is saved and opened in VS Code.
4. Select **Select All**.
5. Open the grid context menu and select **Save as JSON** to save the result to a .json file.
6. Specify a file name for the JSON file. For this tutorial, type **employees.json**.
7. Verify that the JSON file is saved and opened in VS Code.
 ## Next steps
In a real-world scenario, you might create a script that you need to save and run later (either for administration or as part of a larger development project). In this case, you can save the script with a **.sql** extension.
If you're new to T-SQL, see [Tutorial: Writing Transact-SQL Statements] and the [Transact-SQL Reference (Database Engine)].
For more information on using or contributing to the mssql extension, see [the mssql extension project wiki].
For more information on using VS Code, see the [Visual Studio Code documentation](https://code.visualstudio.com/docs).
[**mssql** extension for VS Code]:https://aka.ms/mssql-marketplace
[Download and install VS Code]:https://code.visualstudio.com/Download
[.Net Core instructions]:https://www.microsoft.com/net/core
[manage connection profiles]:https://github.com/Microsoft/vscode-mssql/wiki/manage-connection-profiles
[connection troubleshooting recommendations]:./sql-server-linux-troubleshooting-guide.md#connection
[customize shortcuts]:https://github.com/Microsoft/vscode-mssql/wiki/customize-shortcuts
[Tutorial: Writing Transact-SQL Statements]:https://msdn.microsoft.com/library/ms365303.aspx
[Transact-SQL Reference (Database Engine)]:https://msdn.microsoft.com/library/bb510741.aspx
[Visual Studio Code documentation]:https://code.visualstudio.com/docs
[Windows 10 Universal C Runtime]:https://github.com/Microsoft/vscode-mssql/wiki/windows10-universal-c-runtime-requirement
[customize extension options]: https://github.com/Microsoft/vscode-mssql/wiki/customize-options
[the mssql extension project wiki]: https://github.com/Microsoft/vscode-mssql/wiki
## Next steps
In a real-world scenario, you might create a script that you need to save and run later (either for administration or as part of a larger development project). In this case, you can save the script with a **.sql** extension.
If you're new to T-SQL, see [Tutorial: Writing Transact-SQL Statements] and the [Transact-SQL Reference (Database Engine)].
For more information on using or contributing to the mssql extension, see [the mssql extension project wiki].
For more information on using VS Code, see the [Visual Studio Code documentation](https://code.visualstudio.com/docs).
[**mssql** extension for VS Code]:https://aka.ms/mssql-marketplace
[Download and install VS Code]:https://code.visualstudio.com/Download
[.Net Core instructions]:https://www.microsoft.com/net/core
[manage connection profiles]:https://github.com/Microsoft/vscode-mssql/wiki/manage-connection-profiles
[connection troubleshooting recommendations]:./sql-server-linux-troubleshooting-guide.md#connection
[customize shortcuts]:https://github.com/Microsoft/vscode-mssql/wiki/customize-shortcuts
[Tutorial: Writing Transact-SQL Statements]:https://msdn.microsoft.com/library/ms365303.aspx
[Transact-SQL Reference (Database Engine)]:https://msdn.microsoft.com/library/bb510741.aspx
[Visual Studio Code documentation]:https://code.visualstudio.com/docs
[Windows 10 Universal C Runtime]:https://github.com/Microsoft/vscode-mssql/wiki/windows10-universal-c-runtime-requirement
[customize extension options]: https://github.com/Microsoft/vscode-mssql/wiki/customize-options
[the mssql extension project wiki]: https://github.com/Microsoft/vscode-mssql/wiki