| title | Tutorial: Prepare SQL Server For Replication - Publisher, Distributor, Subscriber | Microsoft Docs | |
|---|---|---|
| ms.custom | ||
| ms.date | 04/02/2018 | |
| ms.prod | sql | |
| ms.prod_service | database-engine | |
| ms.service | ||
| ms.component | replication | |
| ms.reviewer | ||
| ms.suite | sql | |
| ms.technology |
|
|
| ms.tgt_pltfrm | ||
| ms.topic | get-started-article | |
| applies_to |
|
|
| helpviewer_keywords |
|
|
| ms.assetid | ce30a095-2975-4387-9377-94a461ac78ee | |
| caps.latest.revision | 15 | |
| author | MashaMSFT | |
| ms.author | mathoma | |
| manager | craigg | |
| ms.workload | On Demand |
[!INCLUDEappliesto-ss-xxxx-xxxx-xxx-md] It is important to plan for security before you configure your replication topology. This tutorial shows you how to better secure a replication topology as well as how to configure distribution, which is the first step in replicating data. You must complete this tutorial before any of the others.
Note
To replicate data securely between servers, you should implement all of the recommendations in Replication Security Best Practices.
This tutorial teaches you to prepare a server so that replication can run securely with least privileges.
In this tutorial, you will learn how to:
[!div class="checklist"]
- Create Windows Accounts for Replication
- Prepare the Snapshot folder
- Configure Distribution
This Tutorial is intended for users familiar with fundamental database operations, but who have limited exposure to replication.
To complete this Tutorial, your system must have SQL Server Management Studio (SSMS) and these components:
-
At the Publisher server (source):
- Any edition of [!INCLUDEssNoVersion], except SQL Server Express or SQL Compact. These editions cannot be replication Publishers.
- [!INCLUDEssSampleDBUserInputNonLocal] sample database. To enhance security, the sample databases are not installed by default.
-
Subscriber server (destination):
- Any edition of [!INCLUDEssNoVersion], except [!INCLUDEssEW]. [!INCLUDEssEW] cannot be a Subscriber in transactional replication.
-
Install SQL Server Management Studio.
-
Install SQL Server 2017 Developer Edition.
-
Download an AdventureWorks Sample Databases. For instructions on restoring a database in SSMS, please see Restoring a Database.
Note
- Replication is not supported on SQL Servers that are more than two versions apart. For more information, please see Supported SQL Versions in Repl Topology.
- In [!INCLUDEssManStudioFull], you must connect to the Publisher and Subscriber using a login that is a member of the sysadmin fixed server role. For more information on the sysadmin role, please see Server Level Roles.
Estimated time to complete this tutorial: 30 minutes
In this section, you will create Windows accounts to run replication agents. You will create a separate Windows account on the local server for the following agents:
| Agent | Location | Account name |
|---|---|---|
| Snapshot Agent | Publisher | <machine_name>\repl_snapshot |
| Log Reader Agent | Publisher | <machine_name>\repl_logreader |
| Distribution Agent | Publisher and Subscriber | <machine_name>\repl_distribution |
| Merge Agent | Publisher and Subscriber | <machine_name>\repl_merge |
Note
In the replication tutorials, the Publisher and Distributor share the same instance (NODE1\SQL2016) of [!INCLUDEssNoVersion], while the Susbcriber instance (NODE2\SQL2016) is remote. The Publisher and Subscriber may share the same instance of [!INCLUDEssNoVersion], but it is not a requirement. If the Publisher and Subscriber share the same instance, the steps that are used to create accounts at the Subscriber are not required.
-
At the Publisher, open Computer Management from Administrative Tools in Control Panel.
-
In System Tools, expand Local Users and Groups.
-
Right-click Users and then select New User.
-
Enter repl_snapshot in the User name box, provide the password and other relevant information, and then select Create to create the repl_snapshot account:

-
Repeat the previous step to create the repl_logreader, repl_distribution, and repl_merge accounts:

-
Select Close.


-
At the Subscriber, open Computer Management from Administrative Tools in Control Panel.
-
In System Tools, expand Local Users and Groups.
-
Right-click Users and then select New User.
-
Enter repl_distribution in the User name box, provide the password and other relevant information, and then select Create to create the repl_distribution account.
-
Repeat the previous step to create the repl_merge account.
-
Select Close.
See Also: Replication Agents Overview
In this section, you will learn to configure the snapshot folder that is used to create and store the publication snapshot.
-
In Windows Explorer, navigate to the [!INCLUDEssNoVersion] data folder. The default location is C:\Program Files\Microsoft SQL Server\MSSQL.X\MSSQL\Data.
-
Create a new folder named repldata.
-
Right-click this folder and select Properties.
a. On the Sharing tab in the repldata Properties dialog box, select Advanced Sharing.
b. In the Advanced Sharing dialog box, select Share this Folder, and then select Permissions:

-
In the Permissions for repldata dialog box, select Add. In the Select User, Computers, Service Account, or Groups text box, type the name of the Snapshot Agent account created previously, as <Publisher_Machine_Name>\repl_snapshot. Select Check Names, and then select OK:

-
Repeat step 6 to add the other two accounts that were created previously: <Publisher_Machine_Name>\repl_merge and <Publisher_Machine_Name>\repl_distribution
-
Once these three accounts have been added, assign the following permissions:
- repl_distribution - Read
- repl_merge - Read
- repl_snapshot - Full Control


-
Once your share permissions are configured correctly, select OK to close the Permissions for repldata dialog box. Select OK to close the Advanced Sharing dialog box.
-
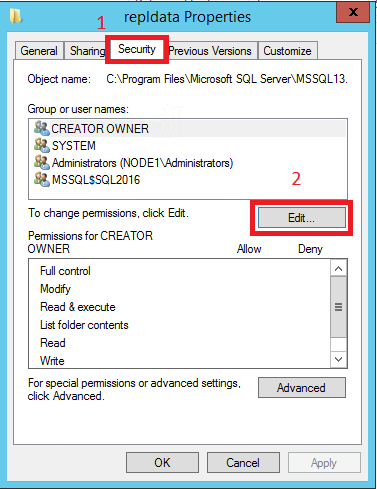
On the repldata Properties, select the Security tab and select Edit:
-
In the Permissions for repldata dialog box, select Add... In the Select User, Computers, Service Account, or Groups text box, type the name of the Snapshot Agent account created previously, as <Publisher_Machine_Name>\repl_snapshot. Select Check Names, and then select OK:

-
Repeat the previous step to add permissions for the Distribution Agent, as <Publisher_Machine_Name>\repl_distribution, and for the Merge Agent as <Publisher_Machine_Name>\repl_merge.
-
Verify the following permissions are allowed:
- repl_distribution - Read
- repl_merge - Read
- repl_snapshot - Full Control

-
Select the Sharing tab again and note down the Network Path for the share. You will need this path later when you're configuring your Snapshot Folder:

-
Select OK to close the repldata Properties dialog box.


See Also:
Secure the Snapshot Folder
In this section, you will configure distribution at the Publisher and set the required permissions on the publication and distribution databases. If you have already configured the Distributor, you must first disable publishing and distribution before you begin this section. Do not do this if you must retain an existing replication topology, especially in Production.
Configuring a Publisher with a remote Distributor is outside the scope of this tutorial.
-
Connect to the Publisher in [!INCLUDEssManStudioFull], and then expand the server node.
-
Right-click the Replication folder and select Configure Distribution:

[!NOTE]
If you have connected to [!INCLUDEssNoVersion] using localhost rather than the actual server name you will be prompted with a warning that [!INCLUDEssNoVersion] is unable to connect to server 'localhost'. Select OK on the warning dialog. In the Connect to Server dialog change the Server name from localhost to the name of your server. Select Connect.The Distribution Configuration Wizard launches.
-
On the Distributor page, select 'ServerName' will act as its own Distributor; SQL Server will create a distribution database and log, and then select Next:

-
If the [!INCLUDEssNoVersion] Agent is not running, on the [!INCLUDEssNoVersion] Agent Start page, select Yes, configure the [!INCLUDEssNoVersion] Agent service to start automatically. Select Next.
-
Enter the path \\<Publisher_Machine_Name>\repldata in the Snapshot folder text box, and then select Next. This path should match what you saw previously under Network Path of your repldata properties folder after configuring your share properties:

-
Accept the default values on the remaining pages of the wizard:

-
Select Finish to enable distribution.
You might see this error when configuring the Distributor. It's an indication that the account used to start the SQL Server Agent account is not an administrator on the system. You'll either need to start the SQL Server Agent manually, grant those permissions to the existing account, or modify which account the SQL Server Agent is using:

If your SQL Server Management Studio is running with administrative rights, you can start the SQL Agent manually from within SSMS:

[!NOTE] If the SQL Agent doesn't visibly start, right-click the SQL Server Agent in SSMS, and Refresh. If it's still in the stopped state, you'll need to start it manually from the SQL Server Configuration Manager.


-
In [!INCLUDEssManStudioFull], expand Security, right-click Logins, and then select New Login:

-
On the General page, select Search, enter <Publisher_Machine_Name>\repl_snapshot in the Enter the object name to select box, select Check Names, and then select OK:

-
On the User Mapping page, in the Users mapped to this login list select both the distribution and [!INCLUDEssSampleDBobject] databases.
In the Database role membership list, select the db_owner role for the login for both databases:

-
Select OK to create the login.
-
Repeat steps 1-4 to create a login for the other local accounts (repl_distribution, repl_logreader, and repl_merge). These logins must also be mapped to users that are members of the db_owner fixed database role in the distribution and AdventureWorks databases:


See Also:
Configure Distribution
Replication Agent Security Model
You have now successfully prepared your server for replication. The next article teaches you how to configure Transactional Replication.
Advance to the next article to learn more
[!div class="nextstepaction"] Next steps