| title | Use the multi-platform VS Code tool for SQL Server on Linux | SQL Server vNext CTP1 |
|---|---|
| description | |
| author | rothja |
| ms.author | jroth |
| manager | jhubbard |
| ms.date | 11-07-2016 |
| ms.topic | article |
| ms.prod | sql-linux |
| ms.service | |
| ms.technology | |
| ms.assetid |
This topic shows how to use Visual Studio Code (VS Code) tool to connect and query SQL Server vNext CTP1 on Linux.
VS Code is a cross-platform graphical code editor that supports extensions. The SQL Tools extension (vscode-mssql) for VS Code enables you to connect and query SQL Server using Transact-SQL.
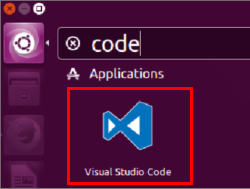
If you have not already installed Visual Studio Code, Download and install VS Code on your Linux machine.
The following steps explain how to install the SQL Tools extension (vscode-mssql).
Important
This section contains internal dogfood instructions for now and will be modified for customers later. It will either be a link to other installation instructions or a brief summary of the steps required.
-
Download and save the VSIX file for the SQL Tools extension from \\dtnuget\download\vscode-mssql\latest. Choose the file that matches your target platform.
-
Start VS Code.
-
On the File menu, click Open.
-
Open the previously saved VSIX file.
-
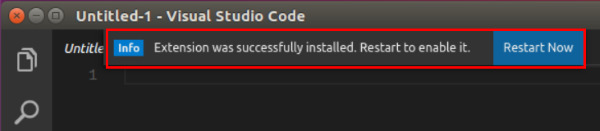
The vscode-mssql extension takes up to one minute to install. Wait for the prompt that tells you it installed successfully.
-
Restart VS Code to use the vscode-mssql extension.


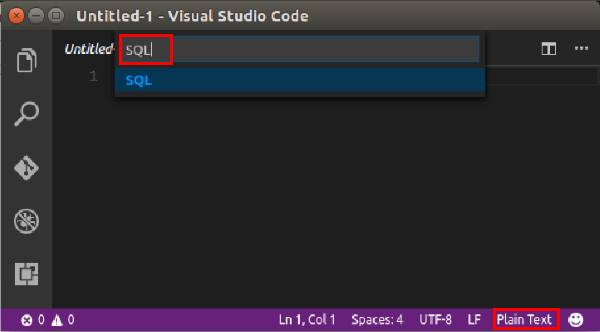
Before you can connect to your SQL Server instance, you must change the Language Mode to SQL. This happens automatically if you open a file with a .sql extension. The following steps show you how to change to the SQL editor for any file.
-
In VS Code, select the File menu, and then select New File.
-
Click the Language Mode selector at the bottom of the editor window. It should say Plain Text for a new file.
-
Type SQL in the Language Mode selector, and then select SQL.

The following steps show how to connect to SQL Server vNext on Linux with VS Code.
-
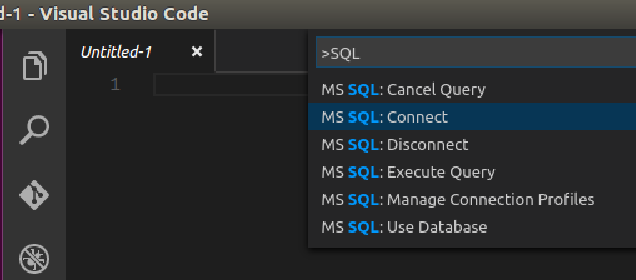
In VS Code, press CTRL+Shift+P (or F1) to open the Command Palette.
-
Type 'SQL' to display the vscode-mssql commands.
-
Select the MS SQL:Connect command.
-
Select Create Connection Profile. This creates a connection profile for your SQL Server instance that you can select in the future from the MS SQL:Connect command.
-
Follow the prompts to enter a sequence of values for the new connection profile. After specifying each value, press Enter to continue.
The following table describes the Connection Profile properties.
Setting Description hostname\instance The SQL Server instance name. For this tutorial, use localhost to connect to the local SQL Server instance on your Linux machine. If connecting to a remote SQL Server, enter the name of the target SQL Server machine or its IP address. [Optional] Database to connect The database that you want to use. For purposes of this tutorial, don't specify a database and press Enter to continue. User name Enter the name of a user with access to a database on the server. For this tutorial, use the default SA account created during setup. Password (SQL Login) Enter the password for the specified user. Save Password? Type Yes to save the password. Otherwise, type No to be prompted for the password each time the Connection Profile is used. [Optional] Enter a name for this profile The Connection Profile name. For example, you could name the profile localhost profile. -
Close the info message that informs you that the profile is created and connected.
[!TIP] If you get a connection failure, first attempt to diagnose the problem from the error message. Then review the connection troubleshooting recommendations.
-
Verify your connection in the status bar.


-
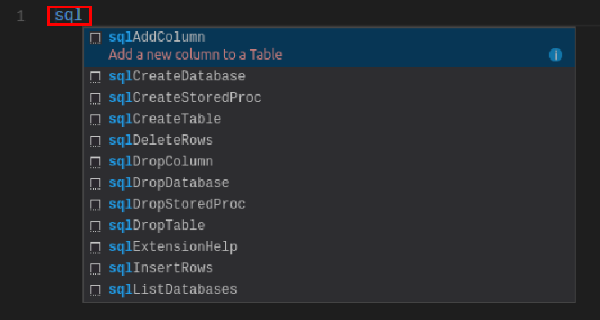
In the editor, type sql to bring up a list of editable code snippets.
 .
. -
Select sqlCreateDatabase.
-
In the snippet, type TutorialDB for the database name.
-
Press CTRL+Shift+E to execute the Transact-SQL commands. View the results in the query window.
[!TIP] You can also highlight specific lines in the editor and execute them with CTRL+Shift+E.

-
Remove the contents of the editor window.
-
Press CTRL+Shift+P to display the Command Palette.
-
Type SQL in the Command Palette to display the SQL commands.
-
Click MS SQL:Use Database, and select the TutorialDB database. This changes the context to the new database created in the previous section.
-
In the editor, type sql to display the snippets, and then select sqlCreateTable.
-
Type Table1 for the table name.
-
Press Tab, and then type dbo for the schema name.
[!NOTE] After adding the snippet, you must type the table and schema names without changing focus away from the VS Code editor.
-
Keep the sample table schema, and press CTRL+Shift+E to create the table.
-
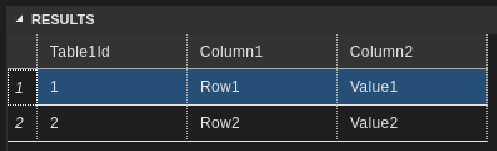
Add the following commands to insert two rows and then select all the rows from the Table1 table.
INSERT INTO dbo.Table1 ( [Table1Id], [Column1], [Column2] ) VALUES ( 1, N'Row1', N'Value1' ), ( 2, N'Row2', N'Value2' ) GO SELECT * FROM Table1 GO -
Press CTRL+Shift+E to execute the commands. The two inserted rows display in the Results window.

In a real-world scenario, you might create a script that you need to save and run later (either for administration or as part of a larger development project). In this case, you can save the script with a .sql extension.
If you're new to T-SQL, see Tutorial: Writing Transact-SQL Statements and the Transact-SQL Reference (Database Engine).
For more information on using VS Code, see the Visual Studio Code documentation.