| title | Tutorial: Add a database to a failover group |
|---|---|
| description | Add a database in Azure SQL Database to an autofailover group using the Azure portal, PowerShell, or the Azure CLI. |
| services | sql-database |
| ms.service | sql-database |
| ms.subservice | high-availability |
| ms.custom | sqldbrb=1, devx-track-azurecli |
| ms.devlang | |
| ms.topic | conceptual |
| author | MashaMSFT |
| ms.author | mathoma |
| ms.reviewer | sstein |
| ms.date | 06/19/2019 |
[!INCLUDEappliesto-sqldb]
A failover group is a declarative abstraction layer that allows you to group multiple geo-replicated databases. Learn to configure a failover group for an Azure SQL Database and test failover using either the Azure portal, PowerShell, or the Azure CLI. In this tutorial, you'll learn how to:
[!div class="checklist"]
- Create a database in Azure SQL Database
- Create a failover group for the database between two servers.
- Test failover.
To complete this tutorial, make sure you have:
- An Azure subscription. Create a free account if you don't already have one.
To complete the tutorial, make sure you have the following items:
- An Azure subscription. Create a free account if you don't already have one.
- Azure PowerShell
To complete the tutorial, make sure you have the following items:
- An Azure subscription. Create a free account if you don't already have one.
- The latest version of the Azure CLI.
[!INCLUDE sql-database-create-single-database]
In this step, you' will create a failover group between an existing server and a new server in another region. Then add the sample database to the failover group.
Create your failover group and add your database to it using the Azure portal.
-
Select Azure SQL in the left-hand menu of the Azure portal. If Azure SQL isn't in the list, select All services, then type Azure SQL in the search box. (Optional) Select the star next to Azure SQL to favorite it and add it as an item in the left-hand navigation.
-
Select the database created in section 1, such as
mySampleDatabase. -
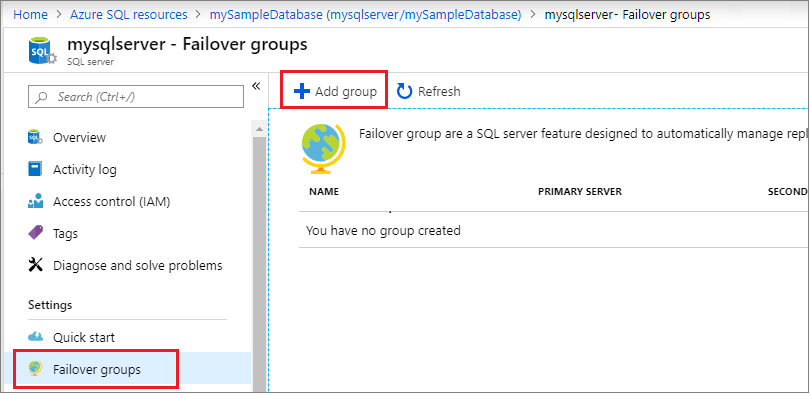
Failover groups can be configured at the server level. Select the name of the server under Server name to open the settings for the server.

-
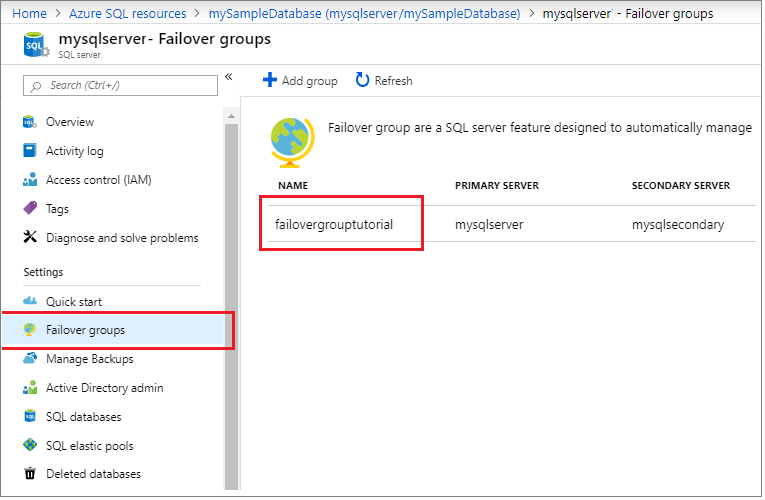
Select Failover groups under the Settings pane, and then select Add group to create a new failover group.
-
On the Failover Group page, enter or select the following values, and then select Create:
-
Failover group name: Type in a unique failover group name, such as
failovergrouptutorial. -
Secondary server: Select the option to configure required settings and then choose to Create a new server. Alternatively, you can choose an already-existing server as the secondary server. After entering the following values, select Select.
- Server name: Type in a unique name for the secondary server, such as
mysqlsecondary. - Server admin login: Type
azureuser - Password: Type a complex password that meets password requirements.
- Location: Choose a location from the drop-down, such as
East US. This location can't be the same location as your primary server.
[!NOTE] The server login and firewall settings must match that of your primary server.
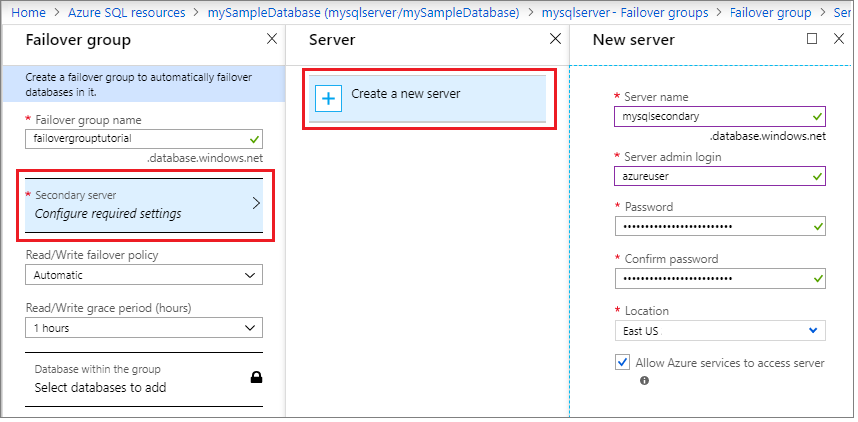
- Server name: Type in a unique name for the secondary server, such as
-
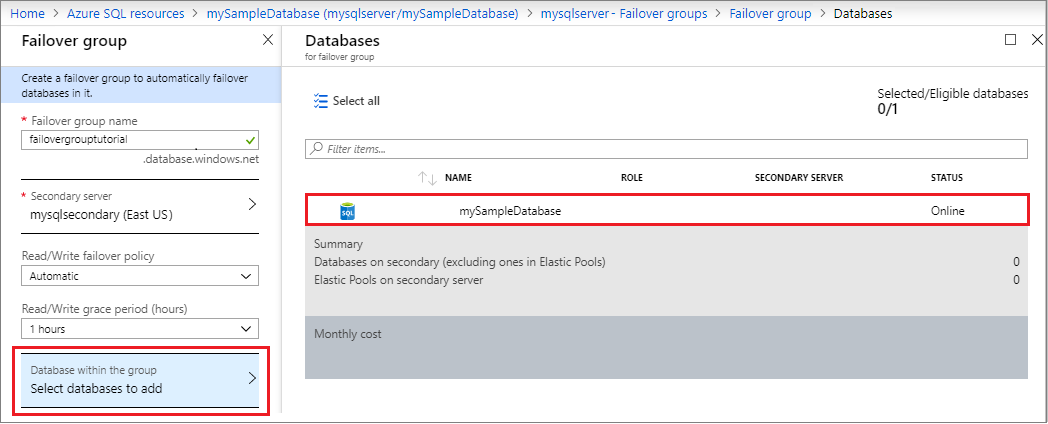
Databases within the group: Once a secondary server is selected, this option becomes unlocked. Select it to Select databases to add and then choose the database you created in section 1. Adding the database to the failover group will automatically start the geo-replication process.
-


Create your failover group and add your database to it using PowerShell.
Note
The server login and firewall settings must match that of your primary server.
# $subscriptionId = '<SubscriptionID>'
# $resourceGroupName = "myResourceGroup-$(Get-Random)"
# $location = "West US"
# $adminLogin = "azureuser"
# $password = "PWD27!"+(New-Guid).Guid
# $serverName = "mysqlserver-$(Get-Random)"
# $databaseName = "mySampleDatabase"
$drLocation = "East US"
$drServerName = "mysqlsecondary-$(Get-Random)"
$failoverGroupName = "failovergrouptutorial-$(Get-Random)"

# The ip address range that you want to allow to access your server
# (leaving at 0.0.0.0 will prevent outside-of-azure connections to your DB)
$startIp = "0.0.0.0"
$endIp = "0.0.0.0"

# Show randomized variables
Write-host "DR Server name is" $drServerName
Write-host "Failover group name is" $failoverGroupName

# Create a secondary server in the failover region
Write-host "Creating a secondary server in the failover region..."
$drServer = New-AzSqlServer -ResourceGroupName $resourceGroupName `
   -ServerName $drServerName `
   -Location $drLocation `
   -SqlAdministratorCredentials $(New-Object -TypeName System.Management.Automation.PSCredential `
      -ArgumentList $adminlogin, $(ConvertTo-SecureString -String $password -AsPlainText -Force))
$drServer

# Create a server firewall rule that allows access from the specified IP range
Write-host "Configuring firewall for secondary server..."
$serverFirewallRule = New-AzSqlServerFirewallRule -ResourceGroupName $resourceGroupName `
   -ServerName $drServerName `
   -FirewallRuleName "AllowedIPs" -StartIpAddress $startIp -EndIpAddress $endIp
$serverFirewallRule

# Create a failover group between the servers
$failovergroup = Write-host "Creating a failover group between the primary and secondary server..."
New-AzSqlDatabaseFailoverGroup `
   –ResourceGroupName $resourceGroupName `
   -ServerName $serverName `
   -PartnerServerName $drServerName  `
   –FailoverGroupName $failoverGroupName `
   –FailoverPolicy Automatic `
   -GracePeriodWithDataLossHours 2
$failovergroup

# Add the database to the failover group
Write-host "Adding the database to the failover group..."
Get-AzSqlDatabase `
   -ResourceGroupName $resourceGroupName `
   -ServerName $serverName `
   -DatabaseName $databaseName | `
Add-AzSqlDatabaseToFailoverGroup `
   -ResourceGroupName $resourceGroupName `
   -ServerName $serverName `
   -FailoverGroupName $failoverGroupName
Write-host "Successfully added the database to the failover group..."
This portion of the tutorial uses the following PowerShell cmdlets:
| Command | Notes |
|---|---|
| New-AzSqlServer | Creates a server in Azure SQL Database that hosts single databases and elastic pools. |
| New-AzSqlServerFirewallRule | Creates a firewall rule for a server in Azure SQL Database. |
| New-AzSqlDatabase | Creates a new single database in Azure SQL Database. |
| New-AzSqlDatabaseFailoverGroup | Creates a new failover group in Azure SQL Database. |
| Get-AzSqlDatabase | Gets one or more databases in Azure SQL Database. |
| Add-AzSqlDatabaseToFailoverGroup | Adds one or more databases to a failover group in Azure SQL Database. |
Create your failover group and add your database to it using the Azure CLI.
Note
The server login and firewall settings must match that of your primary server.
#!/bin/bash
# set variables
$failoverLocation = "West US"
$failoverServer = "failoverServer-$randomIdentifier"
$failoverGroup = "failoverGroup-$randomIdentifier"

echo "Creating a secondary server in the DR region..."
az sql server create --name $failoverServer --resource-group $resourceGroup --location $failoverLocation --admin-user $login --admin-password $password

echo "Creating a failover group between the two servers..."
az sql failover-group create --name $failoverGroup --partner-server $failoverServer --resource-group $resourceGroup --server $server --add-db $database --failover-policy Automatic
This portion of the tutorial uses the following Azure CLI cmdlets:
| Command | Notes |
|---|---|
| az sql server create | Creates a server that hosts databases and elastic pools. |
| az sql server firewall-rule create | Creates a server's firewall rules. |
| az sql failover-group create | Creates a failover group. |
In this step, you'll fail your failover group over to the secondary server, and then fail back using the Azure portal.
Test failover using the Azure portal.
-
Select Azure SQL in the left-hand menu of the Azure portal. If Azure SQL isn't in the list, select All services, then type Azure SQL in the search box. (Optional) Select the star next to Azure SQL to favorite it and add it as an item in the left-hand navigation.
-
Select the database created in the section 2, such as
mySampleDatbase. -
Select the name of the server under Server name to open the settings for the server.
-
Select Failover groups under the Settings pane and then choose the failover group you created in section 2.
-
Review which server is primary and which server is secondary.
-
Select Failover from the task pane to fail over your failover group containing your sample database.
-
Select Yes on the warning that notifies you that TDS sessions will be disconnected.
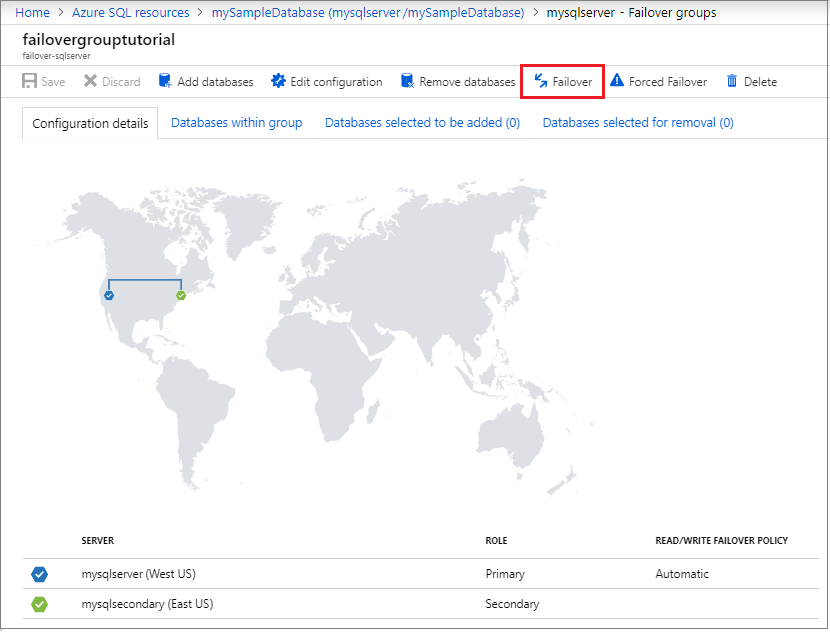
-
Review which server is now primary and which server is secondary. If failover succeeded, the two servers should have swapped roles.
-
Select Failover again to fail the servers back to their original roles.


Test failover using PowerShell.
Check the role of the secondary replica:
# Set variables
# $resourceGroupName = "myResourceGroup-$(Get-Random)"
# $serverName = "mysqlserver-$(Get-Random)"
# $failoverGroupName = "failovergrouptutorial-$(Get-Random)"

# Check role of secondary replica
Write-host "Confirming the secondary replica is secondary...."
(Get-AzSqlDatabaseFailoverGroup `
   -FailoverGroupName $failoverGroupName `
   -ResourceGroupName $resourceGroupName `
   -ServerName $drServerName).ReplicationRole
Fail over to the secondary server:
# Set variables
# $resourceGroupName = "myResourceGroup-$(Get-Random)"
# $serverName = "mysqlserver-$(Get-Random)"
# $failoverGroupName = "failovergrouptutorial-$(Get-Random)"

# Failover to secondary server
Write-host "Failing over failover group to the secondary..."
Switch-AzSqlDatabaseFailoverGroup `
   -ResourceGroupName $resourceGroupName `
   -ServerName $drServerName `
   -FailoverGroupName $failoverGroupName
Write-host "Failed failover group successfully to" $drServerName
Revert failover group back to the primary server:
# Set variables
# $resourceGroupName = "myResourceGroup-$(Get-Random)"
# $serverName = "mysqlserver-$(Get-Random)"
# $failoverGroupName = "failovergrouptutorial-$(Get-Random)"

# Revert failover to primary server
Write-host "Failing over failover group to the primary...."
Switch-AzSqlDatabaseFailoverGroup `
   -ResourceGroupName $resourceGroupName `
   -ServerName $serverName `
   -FailoverGroupName $failoverGroupName
Write-host "Failed failover group successfully back to" $serverName
This portion of the tutorial uses the following PowerShell cmdlets:
| Command | Notes |
|---|---|
| Get-AzSqlDatabaseFailoverGroup | Gets or lists Azure SQL Database failover groups. |
| Switch-AzSqlDatabaseFailoverGroup | Executes a failover of an Azure SQL Database failover group. |
Test failover using the Azure CLI.
Verify which server is the secondary:
echo "Verifying which server is in the secondary role..."
az sql failover-group list --server $server --resource-group $resourceGroup
Fail over to the secondary server:
echo "Failing over group to the secondary server..."
az sql failover-group set-primary --name $failoverGroup --resource-group $resourceGroup --server $failoverServer
echo "Successfully failed failover group over to" $failoverServer
Revert failover group back to the primary server:
echo "Failing over group back to the primary server..."
az sql failover-group set-primary --name $failoverGroup --resource-group $resourceGroup --server $server
echo "Successfully failed failover group back to" $server
This portion of the tutorial uses the following Azure CLI cmdlets:
| Command | Notes |
|---|---|
| az sql failover-group list | Lists the failover groups in a server. |
| az sql failover-group set-primary | Set the primary of the failover group by failing over all databases from the current primary server. |
Clean up resources by deleting the resource group.
Delete the resource group using the Azure portal.
- Navigate to your resource group in the Azure portal.
- Select Delete resource group to delete all the resources in the group, as well as the resource group itself.
- Type the name of the resource group,
myResourceGroup, in the textbox, and then select Delete to delete the resource group.
Delete the resource group using PowerShell.
# Set variables
# $resourceGroupName = "myResourceGroup-$(Get-Random)"

# Remove the resource group
Write-host "Removing resource group..."
Remove-AzResourceGroup -ResourceGroupName $resourceGroupName
Write-host "Resource group removed =" $resourceGroupName
This portion of the tutorial uses the following PowerShell cmdlets:
| Command | Notes |
|---|---|
| Remove-AzResourceGroup | Removes a resource group |
Delete the resource group by using the Azure CLI.
echo "Cleaning up resources by removing the resource group..."
az group delete --name $resourceGroup
echo "Successfully removed resource group" $resourceGroup
This portion of the tutorial uses the following Azure CLI cmdlets:
| Command | Notes |
|---|---|
| az group delete | Deletes a resource group including all nested resources. |
Important
If you want to keep the resource group but delete the secondary database, remove it from the failover group before deleting it. Deleting a secondary database before it is removed from the failover group can cause unpredictable behavior.
[!code-powershell-interactivemain]
This script uses the following commands. Each command in the table links to command specific documentation.
| Command | Notes |
|---|---|
| New-AzResourceGroup | Creates a resource group in which all resources are stored. |
| New-AzSqlServer | Creates a server that hosts single databases and elastic pools in Azure SQL Database. |
| New-AzSqlServerFirewallRule | Creates a firewall rule for a server in Azure SQL Database. |
| New-AzSqlDatabase | Creates a new database in Azure SQL Database. |
| New-AzSqlDatabaseFailoverGroup | Creates a new failover group in Azure SQL Database. |
| Get-AzSqlDatabase | Gets one or more databases in Azure SQL Database. |
| Add-AzSqlDatabaseToFailoverGroup | Adds one or more databases to a failover group in Azure SQL Database. |
| Get-AzSqlDatabaseFailoverGroup | Gets or lists failover groups in Azure SQL Database. |
| Switch-AzSqlDatabaseFailoverGroup | Executes a failover of a failover group in Azure SQL Database. |
| Remove-AzResourceGroup | Removes a resource group in Azure SQL Database. |
[!code-azurecli-interactivemain]
This script uses the following commands. Each command in the table links to command specific documentation.
| Command | Notes |
|---|---|
| az account set | Sets a subscription to be the current active subscription. |
| az group create | Creates a resource group in which all resources are stored. |
| az sql server create | Creates a server that hosts single databases and elastic pools in Azure SQL Database. |
| az sql server firewall-rule create | Creates the server-level IP firewall rules in Azure SQL Database. |
| az sql db create | Creates a database in Azure SQL Database. |
| az sql failover-group create | Creates a failover group in Azure SQL Database. |
| az sql failover-group list | Lists the failover groups in a server in Azure SQL Database. |
| az sql failover-group set-primary | Set the primary of the failover group by failing over all databases from the current primary server. |
| az group delete | Deletes a resource group including all nested resources. |
There are no scripts available for the Azure portal.
You can find other Azure SQL Database scripts here: Azure PowerShell and Azure CLI.
In this tutorial, you added a database in Azure SQL Database to a failover group, and tested failover. You learned how to:
[!div class="checklist"]
- Create a database in Azure SQL Database
- Create a failover group for the database between two servers.
- Test failover.
Advance to the next tutorial on how to add your elastic pool to a failover group.
[!div class="nextstepaction"] Tutorial: Add an Azure SQL Database elastic pool to a failover group