| Title | Tutorial: Script objects in SQL Server Management Studio | ||||||||
|---|---|---|---|---|---|---|---|---|---|
| description | A tutorial for scripting out objects in SSMS | ||||||||
| keywords | SQL Server, SSMS, SQL Server Management Studio, Scripts, Scripting | ||||||||
| author | MashaMSFT | ||||||||
| ms.author | mathoma | ||||||||
| ms.date | 03/13/2018 | ||||||||
| ms.topic | Tutorial | ||||||||
| ms.suite | sql | ||||||||
| ms.prod_service | sql-tools | ||||||||
| ms.reviewer | sstein | ||||||||
| manager | craigg | ||||||||
| helpviewer_keywords |
|
This tutorial teaches you how to generate Transact-SQL (T-SQL) scripts for various objects found within SQL Server Management Studio (SSMS). In this tutorial, you find examples of how to script the following objects:
[!div class="checklist"]
- Queries, when you perform actions within the graphical user interface (GUI)
- Databases in two different ways ("Script As" and "Generate Script")
- Tables
- Stored procedures
- Extended events
This tutorial demonstrates that any object in Object Explorer can be scripted by right-clicking it and selecting the Script Object As option.
To complete this tutorial, you need SQL Server Management Studio, access to a SQL server, and an AdventureWorks database.
- Install SQL Server Management Studio.
- Install SQL Server 2017 Developer Edition.
- Download AdventureWorks2016 sample databases. Instructions for restoring databases in SSMS are found here: Restoring a database.
Any time you perform a task using the GUI in SSMS, you can also generate the T-SQL code associated with that task. The following examples show how to do so when you back up a database and when you shrink the transaction log. These same steps can be applied to any action that's completed via the GUI.
-
Connect to your SQL server.
-
Expand the Databases node.
-
Right-click the database Adventureworks2016 > Tasks > Back up:

-
Configure the backup the way you want. For this tutorial, everything is left at default. However, any changes made in the window will also reflect in the script.
-
Select the option to Script > Script Action to New Query Window:

-
Review the T-SQL populated in the query window.

-
Select Execute to execute the query to back up the database via T-SQL.


-
Right-click the database AdventureWorks2016 > Tasks > Shrink > Files:

-
Select Log from the File type drop-down list box:

-
Select the options Script and Script Action to Clipboard:

-
Open a New Query window and paste (right-click in the window > Paste):

-
Select Execute to execute the query and shrink the transaction log.


The following section teaches you how to script out the database using the Script As and Generate Scripts options. The Script As option recreates the database and its configuration options. The Generate Scripts option allows you to script both the schema and the data. In this section, you create two new databases. You use the Script As option to create AdventureWorks2016a. You use the Generate Scripts option to create AdventureWorks2016b.
-
Connect to your SQL server.
-
Expand the Databases node.
-
Right-click the database AdventureWorks2016 > Script Database As > Create To > New Query Window:

-
Review the database creation query in the window:

- This option scripts out only the database configuration options.
-
On your keyboard, select Ctrl + F to open the Find dialog box. Select the down arrow to open the Replace option. On the top Find line, type AdventureWorks2016, and on the bottom Replace line, type AdventureWorks2016a.
-
Select Replace All to replace all instances of AdventureWorks2016 with AdventureWorks2016a.

-
Select Execute to execute the query and create your new AdventureWorks2016a database.


-
Connect to your SQL server.
-
Expand the Databases node.
-
Right-click the database AdventureWorks2016 > Tasks > Generate Scripts:

-
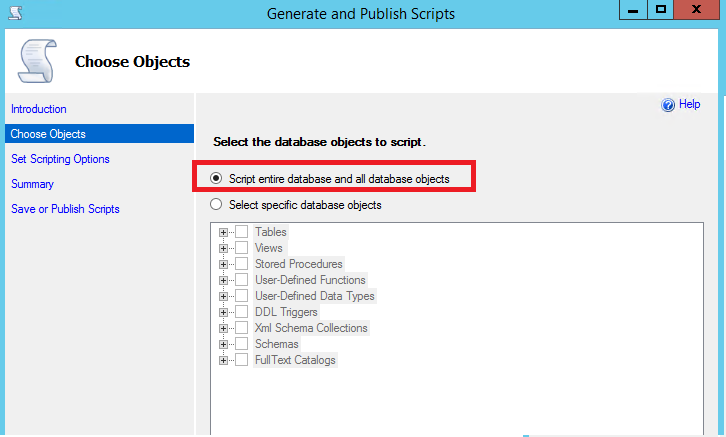
The Introduction page opens. Select Next to open the Chose Objects page. You can select the entire database or specific objects in the database. Select the option Script entire database and all database objects.
-
Select Next to open the Set Scripting Options page. Here you can configure where to save the script and some additional advanced options.
a. Select the option to Save to new query Window.
b. Select Advanced and ensure these options are set:
- Script Statistics set to Script Statistics.
- Types of data to script set to Schema only.
- Script Indexes set to true.

[!NOTE] You have the ability to script the data for the database when you select Schema and data for the Types of data to script option. However, this isn't ideal with large databases. It can take more memory than SSMS is able to allocate. This is okay for small databases. If you want to move data for a larger database, use the import and export wizard.
-
Select OK and then select Next.
-
Select Next on the Summary. Then select Next again to generate the script to a New Query window.
-
On your keyboard, select Ctrl + F to open the Find dialog box. Select the down arrow to open the Replace option. On the top Find line, type AdventureWorks2016. On the bottom Replace line, type AdventureWorks2016b. a. Select Replace All to replace all instances of AdventureWorks2016 with AdventureWorks2016b.

-
Select Execute to execute the query and create your new AdventureWorks2016b database.


This section covers how to script out tables from your database. Use this option to either create the table or drop and create the table. You can also use this option to script the T-SQL associated with modifying the table. For example, to insert into it or update to it. In this section, you'll drop a table and then recreate it.
-
Connect to your SQL server.
-
Expand your Databases node.
-
Expand your AdventureWorks database node.
-
Expand your Tables node.
-
Right-click dbo.ErrorLog > Script Table as > Drop and Create To > New Query Editor Window:

-
Select Execute to execute the query. This action drops the Errorlog table and recreates it.
[!NOTE] The Errorlog table is empty by default in the AdventureWorks2016 database, so you're not losing any data by dropping the table. However, following these steps on a table with data causes data loss.

In this section, you learn how to drop and create a stored procedure.
-
Connect to your SQL server.
-
Expand your Databases node.
-
Expand your Programmability node.
-
Expand your Stored Procedure node.
-
Right-click the stored procedure dbo.uspGetBillOfMaterials > Script Stored Procedure As > Drop and Create to > New Query Window:


This section covers how to script out extended events.
-
Connect to your SQL server.
-
Expand your Management node.
-
Expand your Extended Events node.
-
Expand your Sessions node.
-
Right-click the extended session you're interested in Script Session As > New Query Editor Window:

-
In the new query window, modify the new name of the session from system_health to system_health2. Select Execute to execute the query.
a. Right-click Sessions in Object Explorer. Select Refresh to see your new extended event session. The green icon next to the session indicates the session is running whereas the red icon indicates the session is stopped.

[!NOTE] You can start the session by right-clicking it and selecting Start. However, because this is a copy of the already running system_health session, this step can be skipped. You can delete the copy of the extended event session by right-clicking it and selecting Delete.


The next article introduces you to the prebuilt T-SQL templates found within SSMS.
Go to the next article to learn more:
[!div class="nextstepaction"] Next steps