| author | MashaMSFT |
|---|---|
| ms.service | sql-database |
| ms.subservice | service-overview |
| ms.topic | include |
| ms.date | 01/17/2022 |
| ms.author | mathoma |
| ms.reviewer | vanto |
In this step, you create a logical SQL server and a single database that uses AdventureWorksLT sample data. You can create the database by using Azure portal menus and screens, or by using an Azure CLI or PowerShell script in the Azure Cloud Shell.
All the methods include setting up a server-level firewall rule to allow the public IP address of the computer you're using to access the server. For more information about creating server-level firewall rules, see Create a server-level firewall. You can also set database-level firewall rules. See Create a database-level firewall rule.
To create a resource group, server, and single database in the Azure portal:
-
Sign in to the portal.
-
From the Search bar, search for and select Azure SQL.
-
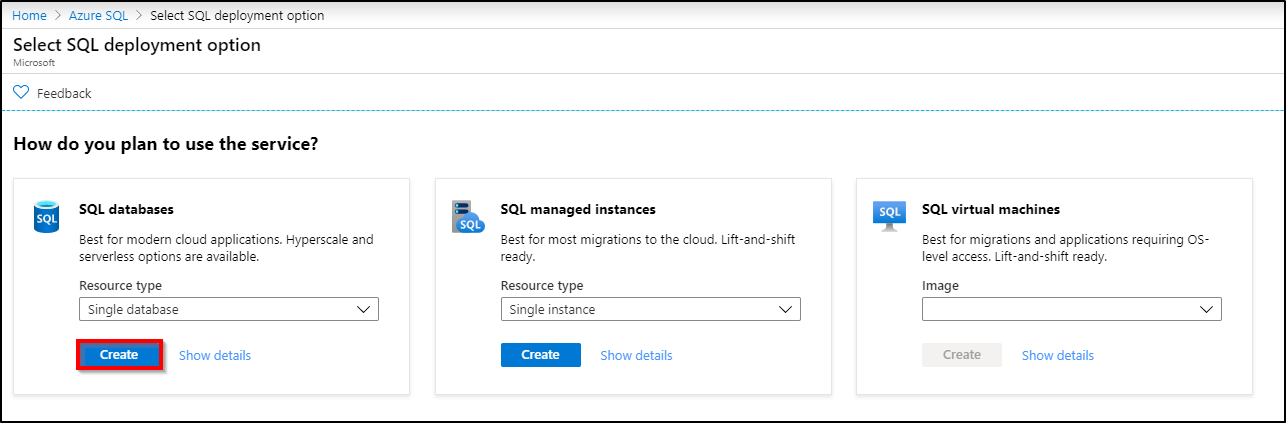
On the Azure SQL page, select Add.

-
On the Select SQL deployment option page, select the SQL databases tile, with Single database under Resource type. You can view more information about the different databases by selecting Show details.
-
Select Create.
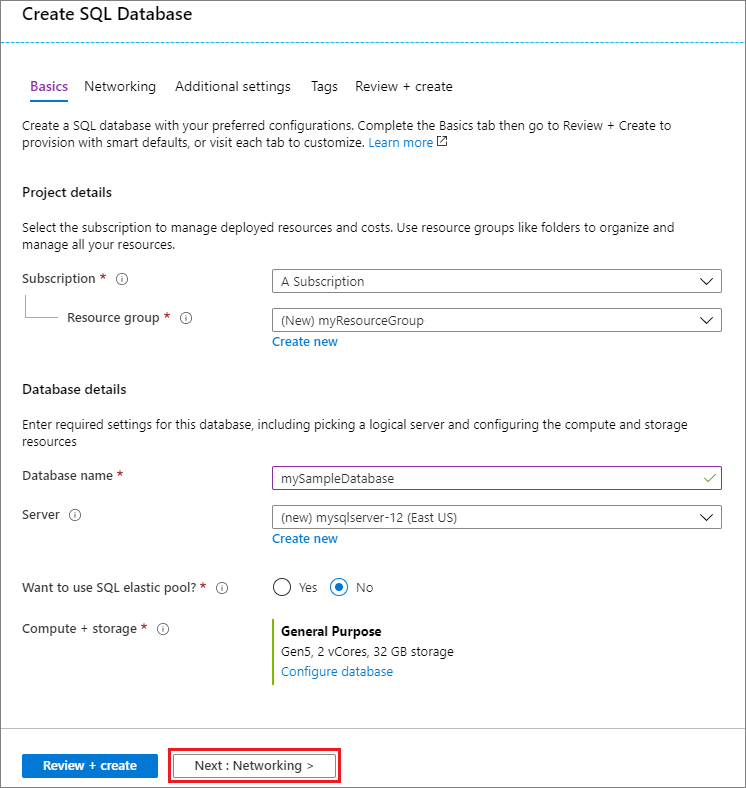
-
On the Basics tab of the Create SQL database form, under Project details, select the correct Azure Subscription if it isn't already selected.
-
Under Resource group, select Create new, enter myResourceGroup, and select OK.
-
Under Database details, for Database name enter mySampleDatabase.
-
For Server, select Create new, and fill out the New server form as follows:
- Server name: Enter mysqlserver, and some characters for uniqueness.
- Server admin login: Enter azureuser.
- Password: Enter a password that meets requirements, and enter it again in the Confirm password field.
- Location: Drop down and choose a location, such as (US) East US.
Select OK.
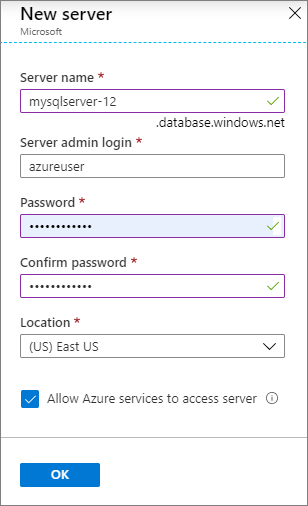
Record the server admin login and password so you can log in to the server and its databases. If you forget your login or password, you can get the login name or reset the password on the SQL server page after database creation. To open the SQL server page, select the server name on the database Overview page.
-
Under Compute + storage, if you want to reconfigure the defaults, select Configure database.
On the Configure page, you can optionally:
- Change the Compute tier from Provisioned to Serverless.
- Review and change the settings for vCores and Data max size.
- Select Change configuration to change the hardware generation.
After making any changes, select Apply.
-
Select Next: Networking at the bottom of the page.
-
On the Networking tab, under Connectivity method, select Public endpoint.
-
Under Firewall rules, set Add current client IP address to Yes.
-
Select Next: Additional settings at the bottom of the page.
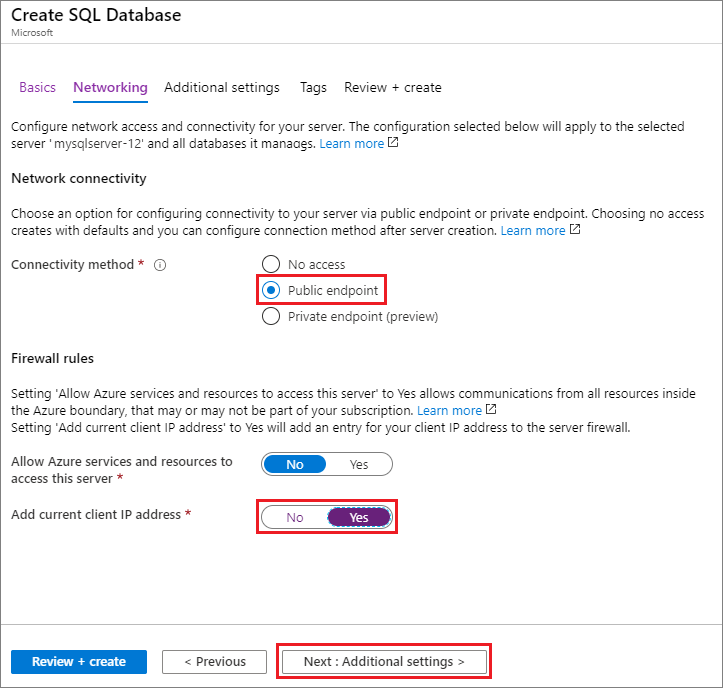
For more information about firewall settings, see Allow Azure services and resources to access this server and Add a private endpoint.
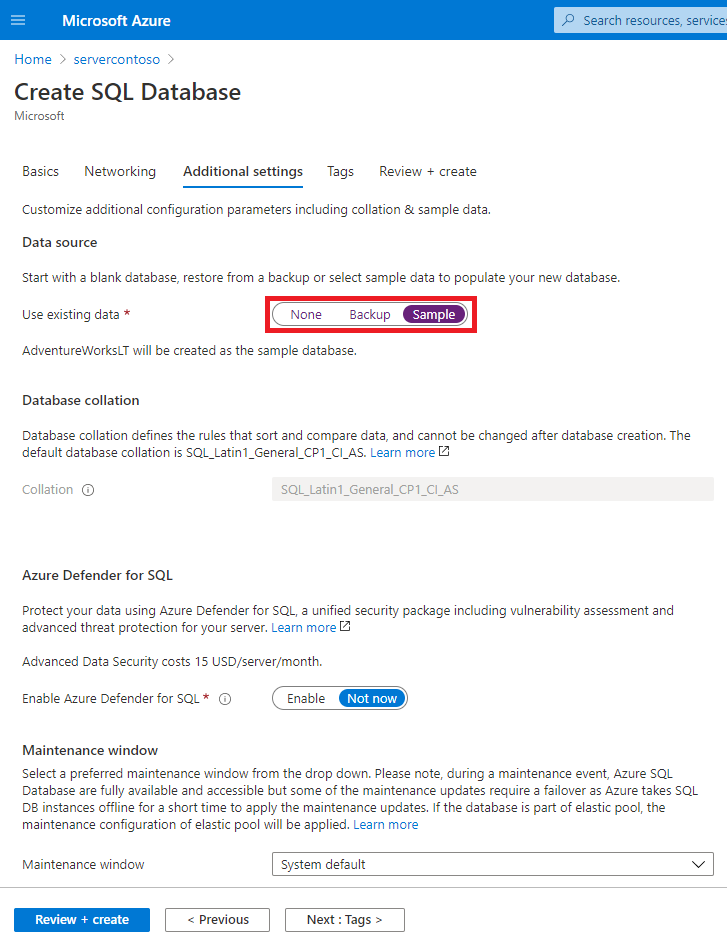
-
On the Additional settings tab, in the Data source section, for Use existing data, select Sample.
-
Optionally, enable Microsoft Defender for SQL.
-
Optionally, set the maintenance window so planned maintenance is performed at the best time for your database.
-
Select Review + create at the bottom of the page.
-
After reviewing settings, select Create.


You can create a resource group, server, and single database using Windows PowerShell. If you don't want to use the Azure Cloud Shell, install the Azure PowerShell module.
[!INCLUDE updated-for-az]
To run the following code sample in the Azure Cloud Shell, select Try it in the code title bar. When the Cloud Shell opens, select Copy in the code sample title bar, and paste the code sample into the Cloud Shell window. In the code, replace <Subscription ID> with your Azure Subscription ID, and for $startIp and $endIp, replace 0.0.0.0 with the public IP address of the computer you're using.
Follow the onscreen prompts to sign in to Azure and run the code.
You can also use Azure Cloud Shell from the Azure portal, by selecting the Cloud Shell icon on the top bar.

The first time you use Cloud Shell from the portal, select PowerShell on the Welcome dialog. Subsequent sessions will use PowerShell, or you can select it from the Cloud Shell control bar.
The following PowerShell code creates an Azure resource group, server, single database, and firewall rule for access to the server. Make sure to record the generated resource group and server names, so you can manage these resources later.
# Set variables for your server and database
$subscriptionId = '<SubscriptionID>'
$resourceGroupName = "myResourceGroup-$(Get-Random)"
$location = "West US"
$adminLogin = "azureuser"
$password = "Azure1234567"
$serverName = "mysqlserver-$(Get-Random)"
$databaseName = "mySampleDatabase"

# The ip address range that you want to allow to access your server
$startIp = "0.0.0.0"
$endIp = "0.0.0.0"

# Show randomized variables
Write-host "Resource group name is" $resourceGroupName
Write-host "Server name is" $serverName

# Connect to Azure
Connect-AzAccount

# Set subscription ID
Set-AzContext -SubscriptionId $subscriptionId

# Create a resource group
Write-host "Creating resource group..."
$resourceGroup = New-AzResourceGroup -Name $resourceGroupName -Location $location -Tag @{Owner="SQLDB-Samples"}
$resourceGroup

# Create a server with a system wide unique server name
Write-host "Creating primary server..."
$server = New-AzSqlServer -ResourceGroupName $resourceGroupName `
   -ServerName $serverName `
   -Location $location `
   -SqlAdministratorCredentials $(New-Object -TypeName System.Management.Automation.PSCredential `
   -ArgumentList $adminLogin, $(ConvertTo-SecureString -String $password -AsPlainText -Force))
$server

# Create a server firewall rule that allows access from the specified IP range
Write-host "Configuring firewall for primary server..."
$serverFirewallRule = New-AzSqlServerFirewallRule -ResourceGroupName $resourceGroupName `
   -ServerName $serverName `
   -FirewallRuleName "AllowedIPs" -StartIpAddress $startIp -EndIpAddress $endIp
$serverFirewallRule

# Create General Purpose Gen4 database with 1 vCore
Write-host "Creating a gen5 2 vCore database..."
$database = New-AzSqlDatabase  -ResourceGroupName $resourceGroupName `
   -ServerName $serverName `
   -DatabaseName $databaseName `
   -Edition GeneralPurpose `
   -VCore 2 `
   -ComputeGeneration Gen5 `
   -MinimumCapacity 2 `
   -SampleName "AdventureWorksLT"
$database
The preceding code uses these PowerShell cmdlets:
| Command | Notes |
|---|---|
| New-AzResourceGroup | Creates a resource group in which all resources are stored. |
| New-AzSqlServer | Creates a server that hosts databases and elastic pools. |
| New-AzSqlServerFirewallRule | Creates a server-level firewall rule for a server. |
| New-AzSqlDatabase | Creates a database. |
For more Azure SQL Database PowerShell samples, see Azure PowerShell samples.
The following Azure CLI code blocks create a resource group, server, single database, and server-level IP firewall rule for access to the server. Make sure to record the generated resource group and server names, so you can manage these resources later.
[!INCLUDE quickstarts-free-trial-note]
[!INCLUDE azure-cli-prepare-your-environment-h3.md]
[!INCLUDE cli-launch-cloud-shell-sign-in.md]
Set the parameter values for use in creating the database and required resources. Server names need to be globally unique across all of Azure so the $RANDOM function is used to create the server name.
Change the location as appropriate for your environment. Replace 0.0.0.0 with the IP address range to match your specific environment. Use the public IP address of the computer you're using to restrict access to the server to only your IP address.
:::code language="azurecli" source="~/azure_cli_scripts/sql-database/create-and-configure-database/create-and-configure-database.sh" range="4-18":::
Use this script to create a resource group with the az group create command. An Azure resource group is a logical container into which Azure resources are deployed and managed.
:::code language="azurecli" source="~/azure_cli_scripts/sql-database/create-and-configure-database/create-and-configure-database.sh" range="19-21":::
Use this script to create a server with the az sql server create command.
:::code language="azurecli" source="~/azure_cli_scripts/sql-database/create-and-configure-database/create-and-configure-database.sh" range="22-24":::
Use this script to create a firewall rule with the az sql server firewall-rule create command.
:::code language="azurecli" source="~/azure_cli_scripts/sql-database/create-and-configure-database/create-and-configure-database.sh" range="25-27":::
Use this script to create a database with the az sql db create command.
:::code language="azurecli" source="~/azure_cli_scripts/sql-database/create-and-configure-database/create-and-configure-database.sh" range="28-30":::
The preceding code uses these Azure CLI commands:
| Command | Description |
|---|---|
| az account set | Sets a subscription to be the current active subscription. |
| az group create | Creates a resource group in which all resources are stored. |
| az sql server create | Creates a server that hosts databases and elastic pools. |
| az sql server firewall-rule create | Creates a server-level firewall rule. |
| az sql db create | Creates a database. |
For additional Azure SQL Database Azure CLI scripts, see Azure CLI samples.